How to empty an inflatable hot tub
Learn how to empty an inflatable hot tub: fitting the drain hose adaptor, clearing the last few centimetres, drying the liner and packing it away.
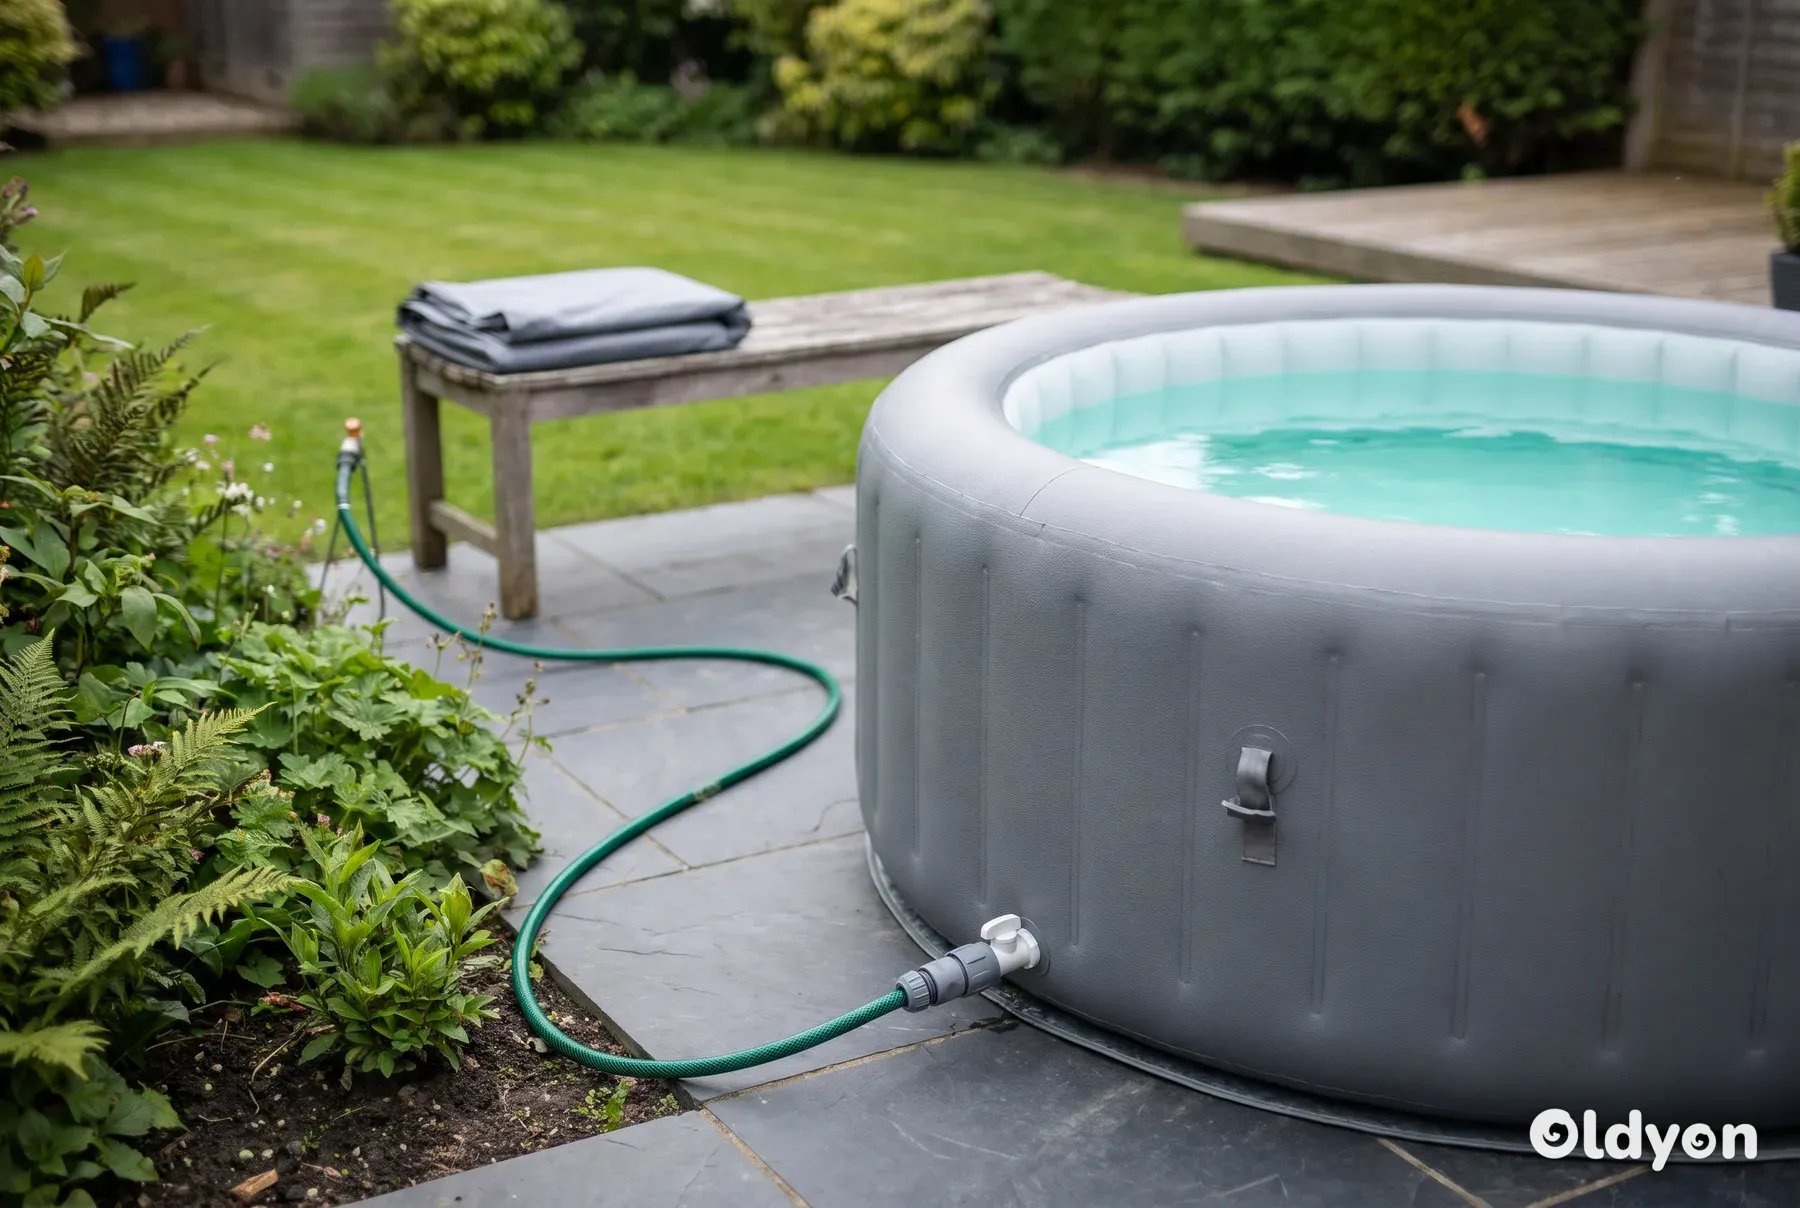
To empty an inflatable hot tub, switch off and unplug the pump unit, attach the drain adaptor and a garden hose to the drain valve on the outside wall, and let the water run to a suitable drain. Then remove the last few centimetres by hand, dry the liner completely and fold it loosely for storage.
Most of the water leaves on its own. The jobs that cause trouble are the ones after that: a hose adaptor that will not seat, a puddle that will not reach the valve, and a liner packed away damp that comes out of the box covered in mould. This guide covers each of those in detail.
Why and when should you drain an inflatable hot tub?
Hot tub water does not stay fresh forever. Every soak adds body oils, sweat, lotions and cosmetics, and the sanitiser leaves behind waste products that it can no longer break down. Together these are called total dissolved solids (TDS).
As total dissolved solids build up, it becomes very hard to hold a safe sanitiser level, even with careful chemical care. Draining on schedule is the cheapest maintenance job you can do, because it costs far less than fighting tired water with extra chemicals.
Water past its useful life also lets bacteria thrive, including Pseudomonas aeruginosa, the cause of the itchy skin rash often called hot tub rash. It lets biofilm, a slimy layer of bacteria, form in the jets and pipework where chemicals struggle to reach. That is why chemicals alone cannot make up for a skipped drain. The CDC's healthy swimming pages explain more about illnesses linked to hot tubs.
If you develop a rash, sore ears or feel unwell after using a hot tub, and it does not settle within a few days, stop using the tub and speak to a pharmacist or your GP.
- Routine use: follow your manual, which commonly suggests a full water change every one to three months
- Heavy use (daily soaks or several bathers): shorten the interval to a full water change roughly every 6 to 8 weeks
- Straight away, whatever the schedule, if the chemicals still will not balance after about 48 hours of adjustment
- Straight away if the water is cloudy, foamy or smells unpleasant
- After anyone with a skin infection or other illness has used the tub: drain it, clean it and sanitise it before anyone else gets in
- Before winter storage or any long break: this is a full drain, clean, dry and pack-away routine (covered later in this guide), not a simple water change
Pick a regular drain date and put a reminder in your calendar for each water change. Draining on a fixed schedule, instead of waiting until the water causes problems, usually means fewer chemical battles, clearer water and less money spent on extra chemicals.
Between water changes, test the sanitiser level at least twice a week. Aim for 3-5 ppm free chlorine, or 3-5 ppm bromine if you use bromine. Regular testing helps prevent waterborne illness and warns you early when the water is reaching the end of its life.
What do you need before you start?
Gather everything before you open the valve, because once the water is flowing you will not want to leave it. If you also want the general draining process for rigid and inflatable tubs, our guide on how to drain a hot tub step by step covers the basics.
- The drain adaptor or drain connector that came with your tub (usually stored with the repair kit or filter housing)
- A garden hose long enough to reach your chosen drain, ideally running downhill the whole way
- A bucket, a large sponge and several old towels
- A wet and dry vacuum, if you have one (very useful for the last few centimetres)
- A soft brush and a mild, non-abrasive cleaner suitable for PVC, or plain water
- An old soft toothbrush for the air-jet openings and other small, awkward spots
- The stoppers or plugs for the pump inlet and outlet ports, if your model uses them
- A chlorine neutraliser such as sodium thiosulphate, if you need to drain before the sanitiser level has fallen
- Your owner's manual, or the manufacturer's online copy
Safety and preparation
Switch off the pump unit at the control panel, then unplug it from the socket or switch off at the isolator. Never handle the pump, the connections or the water with the power still on.
Switch off the power before you remove any water, and keep it off until the tub is refilled. If the pump or heater runs with no water in the tub, it can overheat and burn out within minutes.
Stop adding chlorine or bromine a few days before you drain, so the level falls naturally. A full inflatable tub usually holds somewhere around 600 to 1,000 litres (about 160 to 265 US gallons), and every litre weighs about 1 kg, so never try to move or tip the tub while it is full.
To lower the sanitiser level faster, leave the cover off for 24 to 48 hours, or add a chlorine neutraliser such as sodium thiosulphate following the product's instructions. Test the water before you drain to confirm the level has dropped.
Never send water that still contains chlorine or bromine into a surface-water or storm drain, a pond, a stream or any other waterway. Do not pour it onto grass or plant beds either, where it can burn lawns and kill plants. Once the sanitiser has fallen, a foul-water sewer connection, such as a sink or floor drain, is the safe destination.
A toilet is another acceptable place to empty de-chlorinated hot tub water, because it also connects to the foul-water sewer. It is useful for emptying buckets and the wet and dry vacuum tank during the final stage.
Decide where the water will go before you start. Rules and advice differ between areas, so read where you can drain hot tub water in the UK and check with your local water company if you are unsure.
Read your manual and warranty terms before doing any work on the drain valve. Some manufacturers expect certain servicing to be carried out by a professional, and doing it yourself could affect your cover.
How to empty an inflatable hot tub using the drain valve
Most inflatable hot tubs have a drain valve near the base of the outer wall, protected by a screw cap. Many also have a plug or cover on the inside of the same valve. The exact design varies between brands and even between models from the same brand, so follow your manual where it differs from the steps below.
Some inflatable models use a rubber drain plug low on the outer side wall, sometimes marked 'DRAIN', which you pull out instead of unscrewing a threaded cap. If you cannot find a valve, look near the base of the outer wall, and check your manual for the exact location and for how to connect a hose to it.
- Switch off and unplug the pump unit, and remove the cover. Lift the cover off fully so it cannot slide into the water.
- Take out the filter cartridges and set them aside for cleaning.
- If your model has an inner drain plug, check that it is in the correct position for draining, as shown in your manual.
- Lay the garden hose out towards your drain so the outlet end is lower than the base of the tub.
- Attach the drain adaptor to the end of the garden hose first, and make sure it is pushed or screwed fully home.
- Unscrew the cap from the outside drain valve. Expect a small amount of water to escape on some models.
- Connect the adaptor to the drain valve. On many inflatable tubs, fitting the adaptor is what opens the valve, so the water starts to flow straight away.
- Check the connection for leaks, then leave the water to run. Check the hose every so often to make sure it has not kinked or moved.
- When the flow slows to a trickle, move on to removing the last few centimetres (see below). Leave the adaptor connected for now.
Getting the hose adaptor to fit
The drain adaptor is a small part that causes a lot of frustration. Most are made to fit a standard garden hose, but the thread or push fitting on the valve side is specific to the tub. An adaptor from a different brand often will not seal, even if it looks similar.
If the adaptor leaks where it meets the valve, check that the rubber washer or O-ring is present, clean and seated flat. If it leaks where it meets the hose, a jubilee clip or a standard click-on hose connector usually solves it.
If you have lost the adaptor, contact the manufacturer or an authorised parts supplier for the correct part for your model. Do not force a screwdriver or other tool into the valve to open it, as this can damage the valve seal and cause a slow leak when you refill.
Never deflate the walls of an inflatable hot tub while there is still a significant amount of water inside. The walls hold the water in, and a partly deflated tub can collapse and release a sudden flood across your patio.
Which draining method is fastest?
Gravity draining through the valve is the gentlest method, but it is rarely quick. How long it takes depends on the size of your tub, the length and diameter of the hose, and how far the hose drops below the tub. It can take anything from about an hour to several hours.
Gravity draining also slows markedly after the first hour, because the water level and the pressure behind it drop. This is normal. Check every 30 minutes that the hose has not kinked and that the valve is not blocked by debris such as leaves or hair.
A submersible pump placed in the water speeds things up a great deal. Use one designed for clean water, and plug it into an RCD-protected socket. A siphon with a garden hose also works if your drain point is lower than the tub and the valve is awkward to reach.
As a rough guide, a submersible pump typically empties a standard-sized tub in about 10 to 20 minutes, while gravity draining through the valve usually takes about 1 to 3 hours. If you drain regularly, a pump is worth having.
A garden hose siphon is the slowest method. It typically takes about 2 to 4 hours to empty a tub, so it is best kept for times when the valve or adaptor cannot be used.
For planning your day, allow roughly 2 to 4 hours for the whole job of draining, cleaning and refilling, not counting the time the tub needs afterwards to heat up. A pump shortens the draining step, but clearing the last water, cleaning the liner and filters, and refilling take about the same time whichever method you use.
Method | Best for | Speed | Watch out for |
|---|---|---|---|
Drain valve and hose | Routine draining, no extra equipment | Slow (about 1 to 3 hours) | Kinked hose, outlet not low enough |
Submersible pump | Large tubs, flat gardens, regular draining | Fastest (about 10 to 20 minutes) | Pump running dry, needs a safe power supply |
Garden hose siphon | Missing adaptor, sloping garden | Slowest (about 2 to 4 hours) | Only works if the outlet is lower than the tub |
Wet and dry vacuum | The last few centimetres | Fast for small volumes | Empty the tank often, it fills quickly |
Using a submersible pump
Place the pump at the lowest point of the tub floor and keep it fully submerged. If it sits partly out of the water it loses its prime and stops pulling water. Run the discharge hose as straight as you can so it does not kink.
Plug the pump into a socket well away from the water. If you need an extension lead, use one rated for outdoor use, keep the plug and socket connection dry and off the ground, and keep it well clear of the tub.
If you use a pump, switch it off as soon as it starts drawing air. Most submersible pumps cannot remove the last couple of centimetres anyway, so stop at that point and finish by hand.
Using a garden hose siphon
- Choose a drain point lower than the water level in the tub. A hose of at least about 7.5 m (25 ft) is a sensible length.
- Submerge the whole hose in the tub and let it fill until air bubbles stop rising from it.
- Keep one end under water at the lowest part of the tub, and put your thumb firmly over the other end.
- Lift the covered end out of the tub and lower it to your drain point, below the tub's water level.
- Release your thumb. Water should start flowing within about 5 seconds.
- If it does not flow within about 5 seconds, the siphon has not primed. Refill the hose and start again.
A siphon breaks if the hose kinks or the exit end rises above the water level in the tub. It is slow and usually leaves more water behind than the other methods, so check on it every 30 to 45 minutes.
How do you get the last few centimetres out?
The drain valve sits slightly above the floor of the liner, and the floor itself is rarely perfectly flat. You will almost always be left with a shallow layer of water, often 2 to 5 cm (about 1 to 2 inches) in places, that will not reach the valve on its own.
Clearing water from the air lines
Some water usually stays in the air-jet channels after draining. This is normal and is not a fault. Many manufacturers suggest clearing it by running the bubble or air-jet function briefly before you switch the power off for the last time.
- Once the tub is drained, check that your hands, the plug and the socket are dry, and that the pump unit is clear of any standing water.
- Switch the power on and start only the bubble or air-jet function, on its lowest setting. Do not start the heater or the filter pump.
- Let it run for 30 to 60 seconds. Water will spray or bubble out of the air jets into the tub.
- Switch off at the control panel, then unplug the pump unit or switch off at the isolator, and keep it off until you refill.
- Remove the water that was pushed out, along with the rest of the puddle, using the steps below.
The bubble blower moves air, not water, which is why it can run briefly in an empty tub when the heater and filter pump cannot. Check your manual first, because some models do not allow it, and stop straight away if the unit makes an unusual noise.
Removing the remaining puddle
- Check the tub is still fully inflated so the walls keep their shape while you work.
- Look at where the remaining water collects. It usually gathers on the lowest side of the floor.
- Gently press down on the liner floor from inside, or lift the opposite edge of the tub slightly with a helper, to push the water towards the drain valve. Only do this once most of the water has gone.
- Use a wet and dry vacuum to pull out the remaining pools. Empty its tank into your chosen drain each time it fills.
- If you do not have a vacuum, scoop the water with a small container into a bucket, then soak up the rest with a large sponge.
- Finish with old towels, pressing them into the seams between the floor and the walls, where water hides.
- Remove the drain adaptor and replace the valve cap so dirt and insects cannot get in.
A wet and dry vacuum is the quickest option for this stage. It usually clears the last water in about 5 to 10 minutes and reaches corners that towels cannot. Soaking the water up with towels and wringing them out into a bucket also works, but expect it to take roughly 15 to 20 minutes.
Take your time over this stage. A cupful of water left in a fold of the liner is enough to cause mould and a musty smell by the time you unpack it.
How do you drain the pump unit and hoses?
The pump and heater unit holds water of its own, and it sits outside the liner, so it does not empty when the tub does. Water left inside can grow bacteria, and in cold weather it can freeze and crack internal parts.
- Make sure the pump is switched off and unplugged.
- If your model uses stoppers in the inlet and outlet ports on the inside wall, fit them now so no water runs back from the liner.
- Unscrew the connections between the pump unit and the tub, holding a towel underneath to catch drips.
- Tip the pump unit gently as described in your manual so water drains out of the ports. Do not shake it or turn it upside down unless the manual says you can.
- Leave the pump unit somewhere dry and indoors with the ports open, so the inside can air dry for a day or two.
- Drain and dry any separate hoses, then store them loosely coiled, not tightly bent.
Warm water left standing in pipes and equipment is one of the conditions in which bacteria such as Legionella can grow. The Health and Safety Executive guidance on Legionnaires' disease explains why stagnant water is a risk, which is a good reason to drain everything fully.
How do you dry the liner to stop mould?
Mould grows wherever moisture, warmth and a little organic matter meet. A folded liner in a box is ideal for it, so the aim is to clean off residue and then get the liner completely dry before it is packed away.
An empty tub is also your chance to clean the surfaces that are normally under water: the waterline ring, the floor, the walls and the air jets. Cleaning them removes biofilm (the slimy bacterial layer) and mineral scale, which chemicals alone do not shift.
- With the tub still inflated, wipe the inside walls and floor with a soft cloth and plain water or a mild cleaner suitable for PVC. Pay attention to the waterline, where body oils and residue build up.
- Gently scrub the small air-jet openings with an old soft toothbrush, along with other fiddly spots such as the edges of the drain valve, the pump ports and the seams. A toothbrush clears residue and biofilm from places a cloth cannot reach.
- Rinse with a small amount of clean water and remove it again with the sponge or vacuum.
- Wipe the outside wall and the base, which often picks up damp and grit from the ground.
- Leave the tub inflated with the cover off on a dry, breezy day so air can reach every surface. Avoid leaving an empty liner in strong sun for long periods, as many manufacturers warn that heat and UV light can age the material.
- After a few hours, run a dry towel along every seam and fold. Water often collects there even when the surfaces feel dry.
- Lift the tub onto its side, if it is safe to do so, and dry the underside of the base.
- Clean the cover inside and out, and let it dry fully as well.
Do not use household bleach, glass cleaner or abrasive scourers on the tub surface. They can damage the material and leave residues behind, so use only a spa-safe, non-abrasive cleaner.
Rinse thoroughly after cleaning and remove all of the rinse water. Cleaner residue left on the liner makes the fresh water foam heavily after you refill.
If you find dark spots or a slimy film on the liner, deal with that before storage, not after. Our guide on how to clean mould from an inflatable hot tub explains which cleaners are safe for PVC and which to avoid.
Cleaning the filter
Clean the filter cartridges too, or replace them if they are worn. For Lay-Z-Spa owners, there is a separate guide on how to clean a Lay-Z-Spa filter. Let cartridges dry fully before storing them in a sealed bag.
Rinse each cartridge with a garden hose, spraying between the pleats to wash out trapped debris. About every 3 months, deep-clean it by soaking it in a filter cleaning solution, following the product's instructions.
A clogged or worn filter is one of the most common causes of cloudy water and weak jets or bubbles. If cleaning no longer restores the flow and clarity, replace the cartridge.
Even if a cartridge looks fine, replace it entirely about every 12 to 18 months. Repeated cleaning gradually wears the filter material, so it traps less dirt over time. Check your manual, as some small cartridges are designed to be replaced more often.
How do you refill after draining?
If you are refilling straight away rather than storing the tub, a few simple checks prevent most first-day problems.
- Close the drain valve, or refit the inner plug and the outside cap, before any water goes back in.
- Refit the clean filter cartridges.
- Fill with fresh water only to the fill line shown in your manual. Do not overfill.
- Switch the power back on only once the tub is filled and the filter is refitted.
- Check that the pump circulates and the jets or bubbles flow within a couple of minutes.
- Add sanitiser and balance the water before anyone uses the tub.
If the pump will not circulate, or the jets do not flow within a couple of minutes of switching on, suspect air trapped in the pipework. Trapped air also stops the pump priming. Switch off and check your manual, which explains how to release the air on your model.
If the pump still will not prime after several attempts to release the trapped air, stop trying. Leave it switched off and contact a qualified technician or the manufacturer, because running it repeatedly without water flowing can damage the pump.
Before the first soak, add sanitiser and balance the water. Widely used target ranges are:
- Free chlorine: 3-5 ppm, or bromine: 3-5 ppm
- pH: 7.2-7.6 (some manufacturers accept up to about 7.8, so check your manual)
- Total alkalinity: 80-120 ppm
- Calcium hardness: 150-250 ppm
After adding chemicals, wait at least 2 hours before anyone gets in, and ideally leave the tub overnight to circulate and heat. Keep the water no hotter than 40°C (104°F).
How do you fold and store an inflatable hot tub?
Only start deflating once the liner is dry inside and out. Open the inflation valve as your manual describes, and press gently on the walls to help the air out. Some owners use the reverse setting on an air pump, if their pump has one.
- Lay a clean groundsheet or old sheet on a dry surface to fold the liner on.
- Flatten the deflated tub fully, smoothing out trapped air towards the valve.
- Fold the sides in towards the middle in large, loose folds. Avoid sharp creases, which can weaken the material over time.
- Roll or fold the liner loosely to a size that fits the original box or a large storage bag.
- Check once more for damp patches as you fold. If you find any, open it out and let it dry.
- Close the valves and keep the valve caps in place.
- Pack the liner and cover in the box, and keep the drain adaptor, repair kit and manual with them so they are easy to find next time.
Where to store everything
- Somewhere dry and frost-free, such as a utility room, loft or dry garage
- Off the floor on a shelf or pallet, away from damp and rodents
- Away from sharp tools, garden equipment and anything heavy that could be stacked on top
- Pump unit stored indoors, upright, with the ports open or loosely covered
- Chemicals stored separately, sealed, and out of reach of children and pets
If you are packing away for the colder months, there are a few extra steps for frost protection. Our guide on how to winterise and store an inflatable hot tub covers them in full. Manufacturers also publish storage advice in their manuals, for example on the Lay-Z-Spa website.
What if the water will not drain properly?
Most draining problems have a simple cause. Work through these before assuming a part is faulty.
- No water flows when the adaptor is fitted: the adaptor may not be pushed in far enough to open the valve, or the inner plug may be in the closed position. Check your manual for the correct order.
- Water flows very slowly: look for kinks in the hose, and make sure the outlet end is lower than the tub. A shorter, wider hose drains faster.
- Slow draining on a tub with a rubber drain plug: the plug may be seated crooked. Remove it and reseat it squarely.
- Water leaks around the valve: check the washer or O-ring, and make sure the adaptor is not cross-threaded.
- The valve cap will not unscrew: dry your hands and use a rubber grip. Do not use pliers, which can crack the plastic.
- The valve or cap is stuck with limescale: dab white vinegar around it, wait 10 to 15 minutes, then try again with gentle pressure. Never force it with a wrench or pliers.
- Water keeps returning to the floor: it is running back from the pump ports or seams. Fit the port stoppers and dry the seams with towels.
- Water dribbles from the air jets after draining: this is water left in the air channels, not a leak. Run the bubble function briefly as described above, then dry the floor again.
- The pump unit still drips days later: leave it to dry longer with the ports open before storing it.
If the valve itself is cracked or leaks with the cap fitted, contact the manufacturer before you refill. A worn valve is usually replaceable, but the correct part depends on your model.
Fix a valve that keeps leaking after it is closed promptly. It can partly empty the tub overnight and leave the pump running dry. Replacing the inexpensive O-ring on the valve seat often cures it; if not, fit a replacement valve.
The short version
Switch off the power, let the chemical levels drop, and drain through the valve with the correct adaptor and a hose that runs downhill. Keep the tub inflated until the water is out, briefly run the bubble function to clear the air lines, then clear the last few centimetres with a vacuum, sponge and towels.
Drain the pump unit separately, clean the liner, air jets and filters, and dry every seam before you deflate. Fold loosely, store somewhere dry and frost-free, and keep the adaptor with the tub so next time is easier.
If you are refilling instead, close the valve first, fill to the line, refit the filter, then switch on and balance the water before the first soak. Set aside roughly 2 to 4 hours for the whole job.
Frequently asked questions
Can I empty an inflatable hot tub without the drain adaptor?
Yes. A garden hose siphon or a submersible pump will remove most of the water without opening the drain valve. Lower one end of a full hose into the tub, then take the other end to a point lower than the tub so the water flows. Avoid forcing the valve open with tools, as a damaged seal can leak once you refill.
How often should I empty an inflatable hot tub?
Manufacturers commonly suggest a complete water change every one to three months, but the right interval depends on how often the tub is used, by how many people, and how well the water is balanced. Change it sooner if the water stays cloudy, smells, or will not hold its sanitiser level. Check your manual for your model's recommendation.
Should I deflate the tub before draining it?
No. The inflated walls are what hold the water in place. Deflating too early can cause the walls to fold inwards and release the remaining water in one go. Drain the tub fully, clear the last few centimetres and dry the liner, then deflate it as the final step before folding.
Can I leave an inflatable hot tub set up but empty?
For a few days while it dries, yes. For longer, it is better to pack it away. An empty liner left outdoors is exposed to sun, wind, frost, falling debris and animals. Rainwater can also collect inside and go stagnant. If you must leave it up, keep it inflated, dry and covered.
Can I use the old hot tub water on my garden?
It may be possible once the chlorine or bromine level has fallen close to zero, which usually takes a few days without adding chemicals. Test the water first, spread it over a wide area of lawn rather than one spot, and avoid vegetable beds and ponds. Local rules vary, so check them before draining onto the ground.
Do I need to replace the filter after emptying the tub?
Not always. Rinse the cartridges and inspect them. If the pleats are torn, flattened or discoloured after cleaning, or the end caps are cracked, replace them. A fresh refill paired with a dirty filter will cloud quickly. Store clean cartridges fully dry in a sealed bag until you set the tub up again.
Filed under